Introduction
While I’ve always loved serving vegetables at holiday meals, green beans hold a special place in my heart as the perfect Easter side dish. Their vibrant color and crisp texture bring life to any holiday table, and I’m excited to share my favorite preparation methods with you.
You’ll find that fresh green beans are incredibly versatile and easy to work with. Whether you’re hosting a small family gathering or a large Easter celebration, these recipes will help you create memorable side dishes that everyone will love. I’ve learned through years of cooking that the key is selecting quality beans and using simple ingredients that enhance their natural flavor. Trust me, once you’ve mastered these techniques, you’ll never look at green beans the same way again.
Recipe
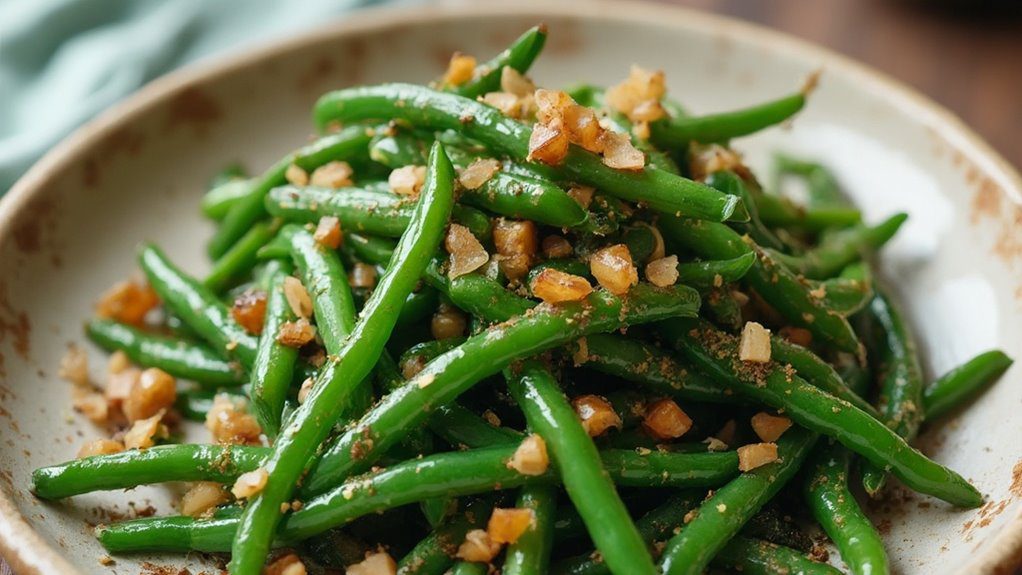
Fresh green beans are a classic Easter side dish that brings vibrant color and nutritious elements to any holiday table. When properly prepared, these crisp vegetables retain their beautiful bright green color while developing a delicate, tender-crisp texture that perfectly complements traditional Easter mains.
This simple yet elegant preparation method uses just five ingredients to create a memorable side dish. The combination of fresh garlic and butter enhances the natural sweetness of the green beans, while proper cooking technique guarantees they maintain their crisp texture and nutrients.
- 2 pounds fresh green beans, trimmed
- 4 tablespoons butter
- 3 cloves garlic, minced
- 1 teaspoon salt
- 1/4 teaspoon black pepper
Bring a large pot of water to a boil and add the trimmed green beans, cooking for 3-4 minutes until bright green and crisp-tender. Immediately drain and transfer to an ice bath to stop the cooking process. In the same pot, melt butter over medium heat, add minced garlic and cook for 30 seconds until fragrant. Return the drained green beans to the pot, season with salt and pepper, and toss until evenly coated and heated through, about 2-3 minutes.
For best results, select fresh green beans that are firm and bright green without blemishes or soft spots. The beans can be trimmed and stored in the refrigerator up to two days before cooking. To maintain the best texture, avoid overcooking the beans in the initial boiling step, and make sure the ice bath is ready before draining. When reheating pre-cooked beans, do so briefly to prevent them from becoming mushy.
Prep Time
Preparing green beans doesn’t have to take all day – I’ve mastered this recipe to keep prep time under 15 minutes total. The most time-consuming part is trimming the beans, but I’ve got a trick that’ll speed things up. Instead of cutting them one by one, I line up several beans and snip off the ends all at once.
While your water’s coming to a boil, you can mince your garlic and measure out your other ingredients. I usually prep double batches for my family gatherings, and it still only takes an extra few minutes. Trust me, once you’ve done this a couple times, you’ll be amazed at how quickly it all comes together. Even my kitchen-shy sister can handle this recipe with confidence.
Equipment needed
The basic equipment needed for perfect green beans won’t overwhelm your kitchen. You’ll want to gather these essential items before getting started:
- A large pot (at least 6-quart capacity) with lid
- Colander or strainer for draining
- Large bowl for ice bath
- Sharp knife and cutting board
- Kitchen tongs or slotted spoon
- Measuring spoons
I’ve found that having a pot with a wide bottom helps the beans cook more evenly. You’ll also need enough counter space to trim your beans and set up your ice bath station. Trust me – don’t skip the ice bath step! When I first started cooking green beans, I learned that shocking them in ice water is key to maintaining that beautiful bright green color and crisp texture.
Basic Cooking Method and Time
Once you’ve gathered your equipment, mastering the basic cooking method for green beans takes just minutes. Start by bringing a large pot of water to a rolling boil, then add your trimmed beans. You’ll want to cook them for just 3-4 minutes until they turn bright green and reach that perfect crisp-tender stage.
Here’s the vital part – don’t skip the ice bath! As soon as they’re done, drain those beans and plunge them into ice water. This stops the cooking process and locks in that gorgeous color. After they’ve cooled, you’ll melt butter in your pot, add minced garlic for 30 seconds, then toss your drained beans back in. Season with salt and pepper, and heat through for 2-3 minutes until they’re warm and evenly coated.
Cooking Steps
Start your green bean cooking journey with a large pot of water at full boil – this guarantees those beans will cook quickly and evenly. Once your water’s bubbling, drop in those trimmed beans and let them cook for 3-4 minutes until they’re bright green and still crisp.
You’ll want to transfer them quickly to an ice bath – trust me, this stops the cooking process and keeps that perfect texture. While your beans are cooling, melt the butter in your pot and add minced garlic until it’s fragrant, about 30 seconds. Now comes the fun part: toss those drained beans back in with salt and pepper, giving everything a good stir until they’re heated through and glistening with buttery goodness.
Step 1. Gather Utensils and Bowls

Before diving into our green bean recipe, gather these essential kitchen tools: a large pot for boiling, a colander for draining, and a spacious bowl filled with ice water. You’ll also need a sharp knife for trimming the beans and a cutting board as your prep station. I always keep tongs handy – they’re perfect for transferring beans in and out of boiling water safely.
Don’t forget measuring spoons for your seasonings and a wooden spoon or spatula for stirring. If you’re like me, you’ll want to keep a few clean kitchen towels nearby for wiping hands and drying the beans after their ice bath. Trust me, having everything ready makes the cooking process so much smoother, especially when you’re juggling other Easter dishes.
Step 2. Prep Vegetables and Seasonings

With our kitchen tools at the ready, let’s prepare those fresh green beans and aromatic seasonings. You’ll want to thoroughly rinse your beans under cool water, then snap off both ends. I’ve found it’s easiest to line up a small handful at a time on your cutting board to trim them quickly.
Next, peel and mince your garlic cloves until they’re fine and fragrant. I like to crush them slightly with the flat side of my knife first – it makes the mincing so much easier! Measure out your salt and pepper into small prep bowls, and cut your butter into tablespoon-sized pieces so it’ll melt evenly. Now we’ve got everything prepped and ready to create those perfectly seasoned Easter green beans.
Step 3. Prepare Boiling Water Bath

As your green beans await their perfect cooking bath, fill a large pot with fresh cold water until it’s about two-thirds full. Place the pot on your largest burner and turn the heat to high. You’ll want to give the water plenty of time to reach a rolling boil – those little bubbles just won’t do for perfectly crisp beans!
While you’re waiting for the water to boil, prepare an ice bath in a large bowl. I’ve learned from experience that skipping this step leads to sad, overcooked beans. Fill the bowl halfway with cold water and add enough ice cubes to keep it chilly. This will be your beans’ quick cool-down spot after their hot bath, ensuring they stay crisp-tender and bright green.
Step 4. Mix Beans With Seasonings

Transforming plain green beans into a flavor-packed side dish starts with the perfect blend of seasonings. You’ll want to melt the butter in your pot first, then add minced garlic and let it become fragrant – about 30 seconds should do it. Once you’ve drained those bright green beans, toss them back into the pot with your garlic butter mixture.
Now’s the time to add salt and pepper, but don’t just dump them in! Sprinkle them evenly while gently tossing the beans to guarantee every piece gets its fair share of seasoning. I’ve found that using tongs works best for this step. Keep tossing for 2-3 minutes until the beans are heated through and glistening with that buttery garlic coating.
Step 5. Serve Hot With Garnish
Once you’ve perfected those buttery green beans, it’s time to plate them for maximum visual appeal. Place them in a warm serving bowl or platter, and you’ll want to work quickly while they’re still steaming hot. I love adding a sprinkle of toasted almonds or crispy fried shallots on top for that perfect finishing touch.
For an elegant presentation, arrange the beans in a neat row rather than piling them randomly. You can garnish with lemon wedges along the sides, which guests can squeeze over their portion. Don’t forget a final light dusting of fresh black pepper and perhaps some finely chopped parsley for color. If you’re serving a crowd, keep a backup batch warm in the oven at low heat, covered with foil.
Customization Options
While these classic buttery green beans are delicious on their own, you’ll love exploring different flavor combinations to make them uniquely yours. Try adding toasted almonds or pine nuts for delightful crunch, or toss in crispy bacon bits for a savory twist. You can also sprinkle Parmesan cheese and red pepper flakes for an Italian-inspired variation.
For a zesty kick, squeeze fresh lemon juice over the beans just before serving, or drizzle with balsamic glaze. I love mixing in sautéed mushrooms and shallots when I’m feeling fancy. You can even experiment with different herbs – fresh dill, thyme, or rosemary each bring their own special touch to the dish. Don’t be afraid to mix and match these additions until you find your family’s perfect combination.
Ingredients list (with precise measurements)
A simple list of six essential ingredients is all you’ll need to create these perfect green beans. Here’s what to gather before you start cooking:
- 2 pounds fresh green beans (trimmed and cleaned)
- 4 tablespoons unsalted butter
- 3 cloves fresh garlic, minced
- 1 teaspoon kosher salt
- 1/4 teaspoon freshly ground black pepper
- 4 cups water for boiling
I’ve found that using unsalted butter gives you better control over the final seasoning, and fresh garlic makes a world of difference compared to the pre-minced variety. You’ll want to pick bright green beans that snap easily – they’re the freshest and will give you that perfect crisp-tender texture we’re aiming for.
Storage Information
Fresh green beans will stay crisp in your refrigerator for up to 5 days when stored properly in a plastic bag with a paper towel. You’ll want to keep them unwashed until you’re ready to use them, as excess moisture can lead to early spoilage. Before storing, remove any beans that show signs of decay or damage.
If you’ve already trimmed and washed your green beans, don’t worry! Just make sure they’re completely dry before storing them. You can pat them with paper towels or use a salad spinner. For longer storage, you can blanch and freeze your green beans for up to 8 months. Simply package them in freezer-safe bags, removing as much air as possible before sealing.
Health Benefits or Special Features
Green beans pack five essential nutrients into their crisp, slender pods, making them a powerhouse vegetable for your dinner table. You’ll get vitamin C for immune support, fiber for gut health, and vitamin K for strong bones. I love how they’re also rich in vitamin A and folate, which are especially important during pregnancy and growth stages.
What’s really special about this Easter preparation method is that it preserves these nutrients better than traditional long-cooking methods. When you blanch them quickly and shock them in ice water, you’re locking in both nutrition and that beautiful bright green color. Plus, you’ll find they’re incredibly versatile – whether you’re serving them with classic holiday ham or incorporating them into modern grain bowls, they’ll bring both health benefits and visual appeal to your plate.
Prep Time
While preparing these holiday green beans might seem challenging, you’ll only need about 15 minutes of hands-on prep time to get them table-ready. The most time-consuming part is trimming the beans, which you can do the day before to save time on Easter Sunday.
Start by snapping off the stem ends – I like to grab a handful and line them up on my cutting board to trim several at once. You’ll spend about 8-10 minutes on trimming, 3 minutes getting your water to boil, and just 3-4 minutes on the actual cooking. While the beans are boiling, you can mince your garlic and measure your other ingredients. The final butter-garlic toss takes only 2-3 minutes, making this a perfectly manageable holiday side dish.
Cook Time
Once you’ve finished prepping your beans, the actual cooking process takes just minutes. You’ll start by boiling them for 3-4 minutes until they’re bright green and crisp-tender. Trust me, I’ve learned the hard way that watching them closely during this step is vital!
After the ice bath (don’t skip this part!), you’ll only need about 5 more minutes to complete the dish. Melt your butter, sauté the garlic for 30 seconds – just enough to get that amazing aroma going – and toss those beans back in. Season them up, and you’re done! I love that this recipe is so quick because it lets you focus on other Easter dishes. The total cooking time is under 10 minutes, which means you’ll have perfectly cooked beans right when you need them.
Total Time
From start to finish, you’ll need about 20 minutes to make these perfect Easter green beans. The prep work takes around 10 minutes – that’s when you’ll trim the beans and mince your garlic. I love that you can do this step ahead of time to make your holiday cooking less stressful.
The actual cooking process moves quickly, which is great when you’re juggling other dishes. You’ll spend about 4 minutes boiling the beans, 1 minute shocking them in ice water, and 5 minutes finishing them in the garlic butter. Trust me, the ice bath step is worth it – it’s what keeps your beans bright green and crispy. Once you’ve mastered this timing, you’ll never serve mushy green beans again!
Yield
This recipe generously serves 6-8 people as a side dish, making it perfect for your Easter gathering. You’ll find that each person gets about 4-5 ounces of green beans, which is an ideal portion size for a holiday meal with multiple sides. If you’re hosting a larger group, I’d recommend doubling the recipe – it’s just as easy to prepare.
For smaller families, don’t worry about leftovers! These buttery green beans reheat beautifully the next day. Just store them in an airtight container in your fridge, and they’ll keep for up to three days. When you’re ready to enjoy them again, simply warm them in a skillet over medium heat for 2-3 minutes, adding a small pat of butter if needed to refresh their flavor.
Final Thoughts
While making perfect green beans might seem intimidating at first, I’ve found that this foolproof recipe never fails to impress my dinner guests. I’ve learned through years of Easter dinners that timing is everything – you’ll want to blanch the beans just until they’re bright green, then shock them in ice water to preserve that beautiful color.
Don’t be afraid to make these beans your own. I sometimes add slivered almonds or lemon zest for extra flair. The key is keeping things simple while focusing on technique. Remember, fresh beans are always worth the extra effort over canned ones. You’ll know you’ve nailed it when your guests ask for the recipe, which happens to me every Easter without fail.
Frequently Asked Questions
Can I Use Frozen Green Beans Instead of Fresh Ones?
You’ll be amazed how well frozen green beans work! While they won’t be quite as crispy as fresh ones, you can definitely use them – just reduce the initial cooking time by 1-2 minutes.
What Other Herbs Can Enhance the Flavor Besides Garlic?
You’ll get great flavor by adding fresh thyme, rosemary, or dill. Lemon zest brightens the dish, while fresh basil or parsley adds a nice pop of color and taste.
How Do I Prevent Beans From Squeaking When Eaten?
Like silencing a squeaky door, you’ll stop that bean squeak by cooking them a bit longer until just tender, but don’t let them turn mushy like overcooked pasta.
Are Yellow Wax Beans an Acceptable Substitute for Green Beans?
You’ll find yellow wax beans make an excellent substitute for green beans in any recipe. They’ve got a similar texture and mild flavor, just prepare them exactly as you would green beans.
Why Do My Green Beans Sometimes Turn Brownish While Cooking?
Your green beans turn brownish when they’re overcooked or exposed to high heat too long. You’ll prevent this by blanching them briefly and shocking in ice water immediately after.
Conclusion
Ready to add these green beans to your Easter menu? You’ll find they’re the perfect complement to any holiday feast, whether you choose a simple butter and herb preparation or go all out with a rich casserole. With just a bit of planning and these easy recipes, you’ll create a side dish that your family will request year after year. Keep it simple or dress it up – either way, success is guaranteed.


