Introduction
When I first discovered keto air fryer chicken thighs, I couldn’t believe how easy it was to create restaurant-quality results at home. After years of struggling with soggy skin and uneven cooking, I finally found the perfect method that’ll give you incredibly crispy chicken every time.
You’re going to love how this recipe combines the richness of garlic butter with perfectly cooked thighs that stay juicy on the inside while developing that coveted crispy exterior. It’s become my go-to dinner option, especially on busy weeknights when I want something delicious but don’t have hours to spend in the kitchen. If you’re following a ketogenic diet, you’ll appreciate that these chicken thighs are naturally low-carb while still being incredibly satisfying.
Recipe
This simple yet flavorful recipe for crispy chicken thighs delivers restaurant-quality results using your air fryer. The combination of garlic butter and perfectly crisped skin creates an irresistible dish that’s both keto-friendly and satisfying.
The key to achieving the perfect crispy skin lies in proper preparation and temperature control. By patting the chicken dry and allowing it to come to room temperature before cooking, you guarantee even cooking and maximum crispiness while maintaining juicy, tender meat inside.
- 4 bone-in, skin-on chicken thighs
- 2 tablespoons melted butter
- 3 cloves minced garlic
- 1 teaspoon salt
- 1/2 teaspoon black pepper
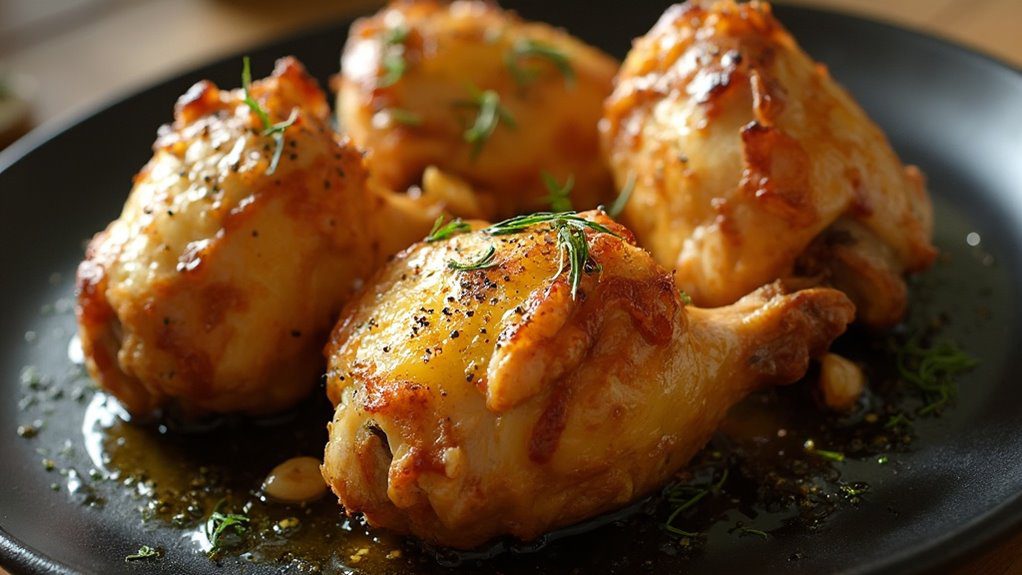
Pat chicken thighs dry with paper towels and let them sit at room temperature for 30 minutes. Season both sides with salt and pepper. Combine melted butter and minced garlic in a small bowl, then brush the mixture all over the chicken thighs, including under the skin. Place the thighs skin-side up in the air fryer basket without overlapping. Cook at 380°F for 20-25 minutes, or until the internal temperature reaches 165°F and the skin is golden brown and crispy.
For best results, avoid opening the air fryer frequently during cooking as this releases heat and affects the crisping process. If cooking more than four thighs, work in batches to prevent overcrowding. Always let the chicken rest for 5 minutes after cooking before serving. The garlic butter can be customized with additional herbs like thyme or rosemary for varied flavor profiles.
Prep Time
Making crispy keto air fryer chicken thighs requires minimal prep time, which makes it perfect for busy weeknight dinners. You’ll need just 10 minutes to get everything ready before cooking begins.
Start by letting your chicken thighs sit at room temperature for 30 minutes – this is hands-off time you can use to tackle other tasks. While you’re waiting, mince your garlic and melt the butter. Then, pat your chicken dry with paper towels (don’t skip this step, it’s essential for crispy skin!). Season both sides with salt and pepper, brush on your garlic butter mixture, and you’re ready to cook. I love how quickly everything comes together, and you won’t believe the restaurant-quality results you’ll get with such simple preparation.
Equipment needed
Air fryer success starts with having the right equipment on hand. Here’s what you’ll need to make these mouthwatering chicken thighs:
- An air fryer with a 4-quart capacity or larger
- Paper towels for patting the chicken dry
- Small mixing bowl for the garlic butter
- Pastry brush or basting brush
- Instant-read meat thermometer
- Measuring spoons
- Tongs for handling hot chicken
I’ve found that having a good instant-read thermometer is essential – it takes the guesswork out of knowing when your chicken’s done. You’ll also want to make sure your air fryer basket has enough space to fit the chicken pieces without crowding. If you’re new to air frying, don’t worry – these basic tools are all you need for perfectly crispy results.
Basic Cooking Method and Time
Once you’ve gathered your equipment, cooking these keto chicken thighs is wonderfully straightforward. You’ll start by setting your air fryer to 380°F and letting it preheat while you prepare the chicken.
Place your seasoned chicken thighs skin-side up in the air fryer basket, making sure they’re not touching each other. You’ll want to cook them for 20-25 minutes total, or until they reach an internal temperature of 165°F. I’ve found that checking them at the 18-minute mark helps guarantee they don’t overcook. The skin should turn a beautiful golden brown and become delightfully crispy. Don’t forget to let them rest for 5 minutes after cooking – trust me, this makes a huge difference in keeping the meat juicy and tender.
Cooking Steps
Before diving into the cooking process, let’s break down these simple steps that’ll give you perfectly crispy chicken thighs every time.
Start by patting your chicken thighs completely dry – this is essential for achieving that golden, crispy skin we’re after. Season both sides generously with salt and pepper, then mix your melted butter with minced garlic in a small bowl. You’ll want to brush this garlic butter mixture all over the thighs, and don’t forget to gently lift the skin to get some of that buttery goodness underneath. Place them skin-side up in your air fryer basket, making sure they’re not touching each other. Set your air fryer to 380°F and cook for 20-25 minutes until the skin turns beautifully crispy.
Step 1. Dry Chicken With Paper Towels

The step that makes the biggest impact on achieving crispy skin starts right here with proper drying technique. Trust me, I’ve learned from experience that moisture is the enemy of crispiness, so you’ll want to be thorough with this step.
Take several paper towels and firmly pat your chicken thighs on all sides, paying special attention to the skin. Don’t just give them a quick once-over – really work to remove as much surface moisture as possible. I like to press down firmly, then use fresh paper towels for a final pat. You’ll know you’re done when the paper towels come away clean and the chicken skin feels tacky rather than wet to the touch. This creates the perfect foundation for that golden, crispy exterior we’re aiming for.
Step 2. Season With Salt-Pepper Mixture

After thoroughly drying your chicken thighs, grabbing your salt and pepper shakers marks the start of building delicious flavor. You’ll want to generously season both sides of the thighs, ensuring even coverage. I’ve found that about 1/4 teaspoon of salt and 1/8 teaspoon of black pepper per thigh gives the perfect balance.
Don’t be shy with the seasoning – chicken thighs can handle it! Make sure you’re lifting the skin and getting some salt and pepper underneath too. This step is essential for flavor that penetrates deep into the meat. I like to hold each thigh in one hand while sprinkling with the other, then give it a gentle pat to help the seasonings stick. Trust me, taking an extra minute here makes all the difference in your final dish.
Step 3. Mix Garlic Butter Mixture

Now that your thighs are perfectly seasoned, let’s make the garlic butter that’ll take these chicken thighs from good to absolutely amazing. In a microwave-safe bowl, melt your 2 tablespoons of butter until it’s just liquid – about 20 seconds should do it. You don’t want it too hot!
Add your minced garlic to the melted butter and give it a good stir. I like to use fresh garlic instead of pre-minced because it adds such incredible flavor. Trust me, those few extra seconds of mincing are totally worth it! Make sure your garlic pieces are really small so they’ll distribute evenly across the chicken. The warmth from the melted butter will help release those wonderful garlic oils and create an aromatic mixture that’ll make your mouth water.
Step 4. Arrange Thighs in Basket

Placing your chicken thighs in the air fryer basket requires a bit of strategy to get that perfect crispy result. You’ll want to position each thigh skin-side up, giving them enough breathing room to guarantee even cooking. I’ve learned from experience that crowding the basket is a rookie mistake – trust me, your taste buds won’t thank you for it!
Make certain the thighs aren’t touching each other, as this helps the hot air circulate properly around each piece. If you’re cooking for a larger group, you’re better off working in batches rather than trying to squeeze them all in at once. I typically arrange mine in a single layer with about half an inch of space between each thigh, which gives me consistently crispy results every time.
Step 5. Monitor Internal Temperature Regularly

While your chicken thighs are cooking away, keeping tabs on their internal temperature is absolutely essential for food safety and the perfect result. You’ll want to check the temperature at the thickest part of the thigh, away from the bone, starting at around 15 minutes into cooking.
I recommend using a digital meat thermometer – it’s your best friend for achieving spot-on results every time. Insert it horizontally into the meat and look for that magic number of 165°F. Don’t worry if you need to check multiple times; it’s better to be safe than sorry! If some thighs are cooking faster than others, simply remove them as they reach temperature and let the others continue cooking until they’re done.
Customization Options
Even though this recipe is delicious as-is, you’ve got plenty of options to customize these keto chicken thighs to match your taste preferences. Try adding different herbs like rosemary, thyme, or sage to the garlic butter mixture for an aromatic twist. You can also experiment with spice blends – I love using smoked paprika, cayenne, or Italian seasoning to create unique flavor profiles.
For a richer taste, consider adding grated parmesan cheese during the last few minutes of cooking, or swap the regular butter for herb-infused butter. If you’re watching your dairy intake, coconut oil makes an excellent butter substitute while keeping things keto-friendly. Just remember that any additions should be low-carb to maintain the recipe’s keto status.
Ingredients list (with precise measurements)

Success in making these crispy keto chicken thighs starts with gathering the right ingredients in precise amounts. You’ll need just a handful of simple ingredients that you probably already have in your kitchen.
Here’s your shopping list:
- 4 bone-in, skin-on chicken thighs (about 6-7 ounces each)
- 2 tablespoons unsalted butter, melted
- 3 cloves fresh garlic, finely minced
- 1 teaspoon fine sea salt
- ½ teaspoon freshly ground black pepper
I’ve found that using bone-in thighs with the skin on is essential for achieving that perfect crispy exterior. While you can use boneless thighs, you won’t get quite the same juicy result. Trust me, I’ve tried both, and bone-in is definitely the way to go for this recipe.
Storage Information
Although these air fryer chicken thighs are best enjoyed fresh off the fryer, I’ve found they store remarkably well for future meals. You can keep them in an airtight container in your refrigerator for up to 4 days, and they’ll maintain their quality surprisingly well.
When you’re ready to reheat, I recommend using your air fryer again at 350°F for 3-4 minutes. This helps restore that wonderful crispy skin. If you’re planning for longer storage, you can freeze these chicken thighs for up to 3 months. Just wrap them individually in foil, then place them in a freezer bag. To reheat from frozen, thaw overnight in your fridge, then use the air fryer method I mentioned. Trust me, I’ve meal-prepped these dozens of times, and they’re always a welcome weekday lunch.
Health Benefits or Special Features
While many chicken recipes claim to be healthy, these keto air fryer chicken thighs truly deliver on both nutrition and flavor. You’ll love that they’re packed with protein and healthy fats while staying incredibly low in carbs – perfect for maintaining ketosis. The skin-on thighs provide essential nutrients like zinc and B vitamins, while the cooking method uses considerably less oil than traditional frying.
I’ve found that air frying is one of the best ways to retain the chicken’s natural nutrients while creating that irresistible crispy exterior. You’re getting all the benefits of dark meat, which is richer in iron and more flavorful than white meat, without the extra calories that come from deep frying. Plus, the garlic adds immune-boosting properties to this already nutritious dish.
Prep Time
When it comes to weeknight meals, you’ll be thrilled to know these keto chicken thighs require just 10 minutes of hands-on prep time. All you need to do is pat the chicken dry, mix up a quick garlic butter sauce, and season with salt and pepper. I love how these simple steps yield such impressive results.
While the total cooking time is about 25 minutes, you won’t be actively working during that period. You’ll just need to:
- Pat chicken dry (2 minutes)
- Mix garlic butter (3 minutes)
- Season and brush with butter mixture (5 minutes)
The remaining time is hands-off while your air fryer works its magic. Remember to factor in 30 minutes if you’re bringing the chicken to room temperature first, though that’s completely passive time.
Cook Time
Since mastering the cook time is essential for perfectly crispy chicken thighs, you’ll want to set your air fryer to 380°F for 20-25 minutes. Keep in mind that timing can vary slightly depending on the size of your thighs and your specific air fryer model.
You’ll know your chicken is done when the skin turns a beautiful golden brown and the internal temperature reaches 165°F. I always recommend using a meat thermometer to check – trust me, I’ve learned the hard way that guessing isn’t worth the risk! For extra-large thighs, you might need to add 2-3 minutes to the cooking time. Don’t forget to let them rest for 5 minutes after cooking; it makes all the difference in keeping those juices locked inside.
Total Time
The total time from prep to table for these crispy air fryer chicken thighs is about 35-40 minutes. You’ll need around 10 minutes for preparation, which includes patting the chicken dry, mixing the garlic butter, and seasoning the meat. If you’re following my recommendation to let the chicken come to room temperature first, add an extra 30 minutes to your planning.
The actual cooking time takes 20-25 minutes in the air fryer, plus a 5-minute rest period after cooking. I’ve found this timing works perfectly for juicy thighs with crispy skin every time. While the chicken’s cooking, you’ll have plenty of time to prepare your favorite keto-friendly sides or toss together a quick salad to complete your meal.
Yield
Each batch of these crispy keto chicken thighs yields 4 generous servings – perfect for a family dinner or meal prep. You’ll get one juicy, perfectly cooked chicken thigh per person, which I’ve found to be just right for most appetites. If you’re cooking for bigger eaters or want leftovers, you can easily double the recipe and cook in two batches.
I love that these thighs are quite filling – the high-fat content from the skin and butter, combined with protein-rich meat, makes them incredibly satisfying. For meal prep, you can store your cooked thighs in an airtight container in the fridge for up to 4 days. While the skin won’t stay quite as crispy, they’ll still taste delicious when reheated in your air fryer for 2-3 minutes.
Final Thoughts
Making these keto air fryer chicken thighs has become my go-to recipe when I want a fuss-free dinner that feels like a treat. After countless times preparing this dish, I can honestly say it’s foolproof and always delivers amazing results.
You’ll love how versatile these chicken thighs are – they’re perfect on their own or paired with your favorite keto sides. I’ve served them with everything from cauliflower rice to roasted Brussels sprouts, and they never disappoint. The garlic butter adds such incredible flavor that even my non-keto friends request this recipe. Don’t be surprised if this becomes your new favorite way to prepare chicken thighs! The crispy skin and juicy meat are truly restaurant-quality, but you’ll save both time and money making them at home.
Frequently Asked Questions
Can I Use Boneless Skinless Chicken Thighs Instead?
You can use boneless skinless thighs, but you’ll need to reduce cooking time to 15-18 minutes and won’t get that crispy skin texture that makes this recipe special.
Why Does My Chicken Skin Sometimes Turn Out Rubbery?
Your chicken skin turns rubbery when there’s too much moisture. Make sure you’re patting the skin completely dry and avoiding overcrowding the air fryer, which traps steam between pieces.
Should I Flip the Chicken Thighs During Cooking?
75% of crispy skin success comes from undisturbed cooking. You shouldn’t flip the chicken thighs – keeping them skin-side up throughout cooking lets the fat render properly and creates perfectly crispy results.
What Sides Pair Well With These Chicken Thighs?
You’ll love pairing these thighs with roasted vegetables like Brussels sprouts, asparagus, or cauliflower rice. A simple green salad or mashed cauliflower also complements the crispy chicken perfectly.
Can I Double the Garlic Butter Sauce for Extra Flavor?
You can definitely double the garlic butter sauce for more flavor, but be careful not to oversaturate the skin, as this might prevent it from getting crispy during cooking.
Conclusion
You’ll love how these keto chicken thighs deliver restaurant-worthy results right from your air fryer. While traditional fried chicken requires messy oil and extra cleanup, this recipe gives you that perfect crispy skin with minimal effort. The rich garlic butter elevates simple chicken into a memorable meal that’s both satisfying and low-carb. Whether you’re a keto veteran or just starting out, these thighs deserve a spot in your weekly rotation.