Introduction
Whether you’re looking for a protein-packed snack or trying to cut dairy from your diet, these turkey jerky bites are about to become your new favorite treat. I’ve spent years perfecting this recipe, and it’s become my go-to option for busy days and outdoor adventures. You’ll love how these savory bites satisfy your hunger while keeping things clean and simple.
These portable snacks are perfect for tossing in your gym bag, hiking pack, or desk drawer. Unlike store-bought versions that often contain questionable ingredients, you’ll know exactly what’s going into your jerky. Trust me, once you start making your own turkey jerky bites, you’ll wonder why you ever settled for processed alternatives. They’re incredibly easy to prepare, and the results are absolutely worth the minimal effort required.
Recipe
Homemade turkey jerky bites are a nutrient-dense snack that packs a powerful protein punch without the dairy, gluten, or artificial preservatives found in many store-bought versions. These bite-sized morsels offer a convenient way to fuel your day while maintaining a clean eating lifestyle.
This simple recipe transforms lean ground turkey into chewy, flavorful bites through a combination of carefully selected seasonings and slow dehydration. The process concentrates both nutrients and flavors, resulting in a portable snack that stays fresh for weeks when properly stored.
- 1 pound lean ground turkey
- 2 tablespoons soy sauce
- 1 teaspoon black pepper
- 1 teaspoon garlic powder
- 1 teaspoon onion powder
In a large bowl, thoroughly combine ground turkey with soy sauce and all seasonings until well mixed. Spread the mixture evenly and thinly onto dehydrator trays lined with non-stick sheets, maintaining consistent thickness throughout. Set dehydrator to 165°F (74°C) and dry for 4-6 hours, or until the meat is completely dry and breaks apart easily. Alternatively, place on a lined baking sheet in an oven set to its lowest temperature (usually 170°F/77°C) for 3-4 hours, rotating trays halfway through for even drying.
For best results, partially freeze the ground turkey before mixing to make it easier to handle and spread. Always verify your work surface and hands are clean before starting. Test the jerky’s doneness by bending a piece – it should crack but not break. Let the jerky cool completely before storing in an airtight container, and add a food-grade desiccant packet to maintain freshness. The jerky will keep for 2-3 weeks at room temperature or up to 6 months in the freezer.
Prep Time
Preparing these turkey jerky bites takes about 15-20 minutes of active kitchen time, which you’ll spend mixing ingredients and arranging the meat on dehydrator trays. You’ll find it’s mostly a hands-off process once everything’s set up, though you’ll want to check on them periodically during dehydration.
To save time, I recommend measuring out all your seasonings first. You can mix the spices while the turkey’s partially freezing, which makes it easier to handle. If you’re planning to pre-cook the meat before dehydrating, add another 10 minutes to your prep time. The actual drying time isn’t included in the prep, since you can go about your day while the dehydrator does its work.
Equipment needed
The basic equipment for making turkey jerky bites includes both essential and optional items for success. You’ll need a large mixing bowl, measuring spoons, and either a food dehydrator or a regular oven. If you’re using an oven, grab a baking sheet and some parchment paper.
For the best results, I recommend having these additional tools on hand:
- Non-stick dehydrator sheets or silicone mats
- Meat thermometer to verify food safety
- Sharp knife or kitchen scissors
- Airtight storage containers
- Plastic wrap for easier spreading
- Paper towels for blotting excess moisture
I’ve found that a food processor can help achieve consistent texture, though it’s not required. Remember, you don’t need fancy equipment – I started making jerky using just my oven and basic kitchen tools.
Basic Cooking Method and Time
Once you’ve gathered your equipment, making turkey jerky bites follows a straightforward cooking process that I’ve perfected through lots of trial and error. First, mix your seasoned turkey mixture thoroughly – I mean really get in there with clean hands until everything’s well combined. Trust me, it’s worth the mess!
Spread the mixture evenly on your dehydrator trays or baking sheets, keeping it about ¼-inch thick. If you’re using a dehydrator, set it to 165°F and let it run for 4-6 hours. For oven users, use the lowest setting (usually around 170°F) and dehydrate for 3-4 hours. You’ll know they’re done when the meat breaks apart easily and feels completely dry. I check mine every hour after the three-hour mark, just to be safe.
Cooking Steps
Before diving into the cooking steps, you’ll want to gather your ingredients and equipment for a smooth jerky-making process. First, mix your ground turkey with soy sauce and seasonings until everything’s well combined. You’ll know it’s ready when the mixture looks uniform in color.
Next, spread the seasoned meat mixture thinly onto your dehydrator trays or baking sheets. I’ve found that using a spatula helps create an even layer about ¼-inch thick. If you’re using an oven, line your baking sheets with parchment paper first. Set your dehydrator to 165°F or your oven to its lowest setting, then let the magic happen. Check the jerky periodically – it’s done when it’s completely dry and breaks cleanly when bent.
Step 1. Pre-Thaw Ground Turkey Completely

Properly thawing your ground turkey makes all the difference in creating perfect jerky bites. You’ll want to move your frozen turkey from the freezer to the fridge at least 24 hours before you plan to make your jerky. I’ve learned from experience that trying to rush this step leads to uneven texture and potential food safety issues.
Once you’ve transferred the meat to your refrigerator, place it on a bottom shelf in a covered container to catch any drips. You’ll know it’s ready when there aren’t any icy chunks left, and the meat feels consistently cold and pliable throughout. Don’t leave it on the counter to speed things up – that’s asking for trouble with bacteria growth. Trust me, patience here pays off in better-tasting, safer jerky bites.
Step 2. Mix Dry Ingredients Separately

After your ground turkey has thawed completely, let’s focus on the seasoning mix that’ll give your jerky its signature flavor. I’ve learned through trial and error that combining the dry ingredients separately first guarantees even distribution throughout the meat. In a small bowl, mix your black pepper, garlic powder, and onion powder until they’re well blended.
You’ll want to break up any clumps in the seasonings by using the back of a spoon – trust me, nobody wants to bite into a pocket of pure garlic powder! This step might seem simple, but it’s essential for consistent flavor in every bite. Once your spices are properly mixed, you can set them aside while you prepare to season your ground turkey.
Step 3. Form Into Small Patties

Let’s plunge into forming your seasoned turkey mixture into consistently-sized patties. You’ll want to grab small portions of the mixture – about 2 tablespoons each – and gently roll them into balls between your palms. Then, press each ball into a thin patty that’s roughly 1/4 inch thick.
For uniform cooking, try to keep all your patties the same size. I’ve found that using a measuring spoon helps maintain consistency, and pressing them against wax paper prevents sticking. Space the patties about half an inch apart on your dehydrator trays or baking sheet. If you’re working with sticky meat, lightly wet your hands with cold water between forming patties – it’ll make the process much smoother and cleaner.
Step 4. Arrange on Dehydrator Trays

Setting up your dehydrator trays correctly makes all the difference in creating perfect turkey jerky bites. Start by lining each tray with non-stick dehydrator sheets to prevent sticking and make cleanup easier. You’ll want to leave a bit of space between each portion for proper air circulation.
Take your seasoned turkey mixture and spread it evenly across the trays, keeping the thickness consistent at about 1/4 inch. I’ve found that using slightly damp hands helps prevent the meat from sticking to your fingers during this process. If you’re using a jerky gun, pipe the mixture in strips with small gaps between them. Don’t overcrowd the trays – remember that proper airflow is essential for even drying and the best possible texture.
Step 5. Check Internal Meat Temperature
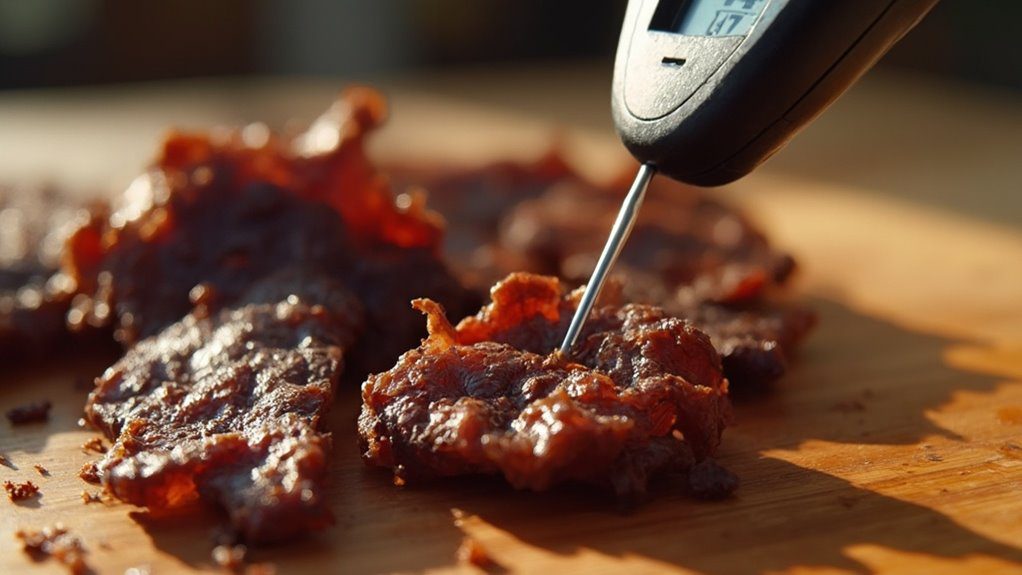
Monitoring your turkey jerky’s internal temperature throughout the drying process helps guarantee it’s safe to eat and properly preserved. You’ll want to check that your jerky reaches at least 165°F (74°C) to eliminate any harmful bacteria. I always keep a meat thermometer handy and test multiple spots on the meat.
To check the temperature, insert your thermometer into the thickest parts of your jerky pieces. Don’t rely on appearance alone – while the outside might look done, the inside needs to hit that essential temperature mark. If you’re using an oven method, you might need to rotate your trays occasionally for even heating. Once you’ve confirmed the proper temperature, you can be confident your jerky will be both delicious and safe for storage.
Customization Options
While the basic turkey jerky recipe is delicious on its own, I’ve found that experimenting with different flavor combinations can transform these protein-packed bites into something truly special. You can customize your jerky by adding:
- Spicy kick: Mix in red pepper flakes or cayenne
- Asian fusion: Add ginger powder and sesame oil
- BBQ style: Incorporate smoked paprika and brown sugar
- Mediterranean: Include dried oregano and lemon zest
- Southwest: Mix in ground cumin and chili powder
I’ve discovered that adding 1-2 teaspoons of your chosen spices works best. My personal favorite is the Asian fusion blend – it reminds me of the jerky I tried while traveling through Southeast Asia. Don’t be afraid to play with flavors; just remember to keep the base ratio of meat to soy sauce the same for proper preservation.
Ingredients list (with precise measurements)
Now that we’ve explored different flavor combinations, let’s get down to the exact measurements you’ll need for these tasty turkey jerky bites. You’ll want to gather:
- 1 pound lean ground turkey (93% lean works best)
- 2 tablespoons soy sauce
- 1 teaspoon black pepper
- 1 teaspoon garlic powder
- 1 teaspoon onion powder
I’ve found these proportions create the perfect balance of savory flavors without overwhelming the natural taste of the turkey. You’ll notice I’ve kept the ingredient list simple – that’s because these basic seasonings really do the heavy lifting. If you’re watching your sodium intake, you can reduce the soy sauce to 1½ tablespoons, though I wouldn’t go lower than that as it helps with preservation and flavor.
Storage Information
Proper storage techniques can extend your turkey jerky bites’ shelf life up to three weeks when done correctly. After you’ve finished dehydrating your jerky, let it cool completely to prevent unwanted moisture from building up in your storage container.
You’ll want to use an airtight container or vacuum-sealed bag to keep your jerky fresh. I’ve found that mason jars work perfectly, especially if you add a food-grade silica gel packet to absorb any excess moisture. Store your container in a cool, dry place away from direct sunlight – your pantry is ideal. If you’re planning to keep the jerky longer than three weeks, pop it in the freezer where it’ll stay good for up to six months.
Remember to check your jerky occasionally for any signs of mold or unusual odors.
Health Benefits or Special Features
Beyond serving as a delicious snack, turkey jerky bites pack an impressive nutritional punch that makes them an excellent choice for health-conscious snackers. You’ll get about 20 grams of protein per serving, which helps build muscle and keeps you feeling full longer. Plus, since they’re dairy-free, they’re perfect if you’re lactose intolerant or following a dairy-restricted diet.
These portable bites also offer other great features: they don’t need refrigeration, won’t make a mess in your bag, and they’re incredibly versatile. I love that they’re low in fat compared to beef jerky, and they don’t contain any artificial preservatives when you make them at home. Whether you’re hitting the gym, hiking trails, or just need a protein boost at work, these turkey jerky bites have got you covered.
Prep Time
Making these turkey jerky bites takes a bit of planning, but the actual hands-on prep time is surprisingly quick. You’ll need about 15-20 minutes to mix the ingredients and shape the meat, which I find is perfect for fitting into a busy schedule.
I recommend setting aside about 10 minutes to measure and combine your seasonings with the ground turkey. Then, spend another 5-10 minutes spreading the mixture onto your dehydrator trays or baking sheets. While the total process takes 4-6 hours, most of that time is hands-off as your jerky dries. I often prep these in the morning, let them dehydrate while I work, and they’re ready by late afternoon.
Cook Time
While the total drying time varies based on your equipment, you’ll need approximately 4-6 hours in a dehydrator set to 165°F or 3-4 hours in an oven at its lowest setting. You’ll know your turkey jerky bites are ready when they’re completely dry and break apart easily. I’ve found that checking them every hour helps prevent over-drying.
If you’re using the pre-cooking method for extra food safety, you’ll need to add about 10 minutes to brown the seasoned turkey mixture in a skillet before dehydrating. Keep an eye on the edges of your jerky pieces, as they tend to dry faster than the center. Trust me, the wait is worth it – these protein-packed bites develop an amazing concentrated flavor during the drying process.
Total Time
The total time investment for these turkey jerky bites spans between 4.5-7 hours from start to finish. While this might seem long, you’ll only need about 30 minutes of active prep time – the rest is hands-off dehydrating. You’ll spend about 15 minutes mixing ingredients and spreading the meat mixture, then let your dehydrator or oven do the heavy lifting.
The time variation depends on your drying method and desired texture. If you’re using a dehydrator, plan for 4-6 hours, while an oven typically takes 3-4 hours. Don’t rush the process – proper drying guarantees your jerky will store well and maintain that perfect chewy texture. I like to make these on weekends when I’m doing other tasks around the house.
Yield
One pound of seasoned ground turkey yields approximately 8 ounces of finished jerky bites, giving you about 16 satisfying servings. You’ll find that each serving is roughly half an ounce, which is perfect for portion control and easy snacking throughout your day. I’ve found that these bite-sized pieces are just right for tossing into zip-top bags or small containers.
Remember that meat typically loses about 50-60% of its weight during the dehydration process, which is completely normal. Don’t worry if your yield varies slightly – factors like how thinly you spread the meat and your dehydration time can affect the final amount. If you’re meal prepping for the week, you might want to double the recipe since these protein-packed bites tend to disappear quickly!
Final Thoughts
Making your own turkey jerky bites opens up a world of healthy snacking possibilities. You’ll love having these protein-packed treats ready whenever hunger strikes, and you won’t believe how simple they are to prepare. I’ve made these countless times, and they’re perfect for everything from road trips to afternoon meetings.
Once you’ve mastered this basic recipe, don’t be afraid to experiment with different seasonings and spices. Try adding crushed red pepper for heat or Italian herbs for a Mediterranean twist. You’ll find that homemade jerky is not only more economical than store-bought versions but also lets you control the ingredients. Plus, there’s something incredibly satisfying about making your own preservative-free, protein-rich snacks that’ll keep you energized throughout your busy day.
Frequently Asked Questions
Can I Use Turkey Breast Instead of Ground Turkey?
You can use turkey breast, but you’ll need to slice it very thinly against the grain and pound it flat before marinating. It’ll require longer drying time.
How Do I Know When the Jerky Is Dry Enough?
90% of moisture must be removed for safe jerky. You’ll know it’s ready when the pieces crack but don’t break completely when bent, and they’re dry throughout with no soft spots.
Will Adding Marinades Affect the Drying Time?
Yes, adding marinades will extend your drying time because they introduce more moisture. You’ll need to add 1-2 hours to the process depending on how wet your marinade is.
Can I Freeze Turkey Jerky Bites for Longer Storage?
You’ll absolutely love how freezing works for turkey jerky! You can store your bites in the freezer for up to 6 months in an airtight container, but they’re probably too delicious to last that long.
What’s the Best Way to Prevent the Jerky From Sticking?
You’ll prevent sticking by using non-stick dehydrator sheets or parchment paper on your trays. It’s also helpful to lightly spray the surface with cooking oil before adding the meat mixture.
Conclusion
You’ll love how these turkey jerky bites revolutionize your snacking routine, just like how the telegraph transformed communication in its day. They’re perfect for tossing in your gym bag or hiking pack when you need a protein boost. Once you’ve mastered this simple recipe, you’ll wonder why you ever bought store-bought jerky. Go ahead and make a batch – your future self will thank you for this dairy-free, protein-packed treat.


