Introduction
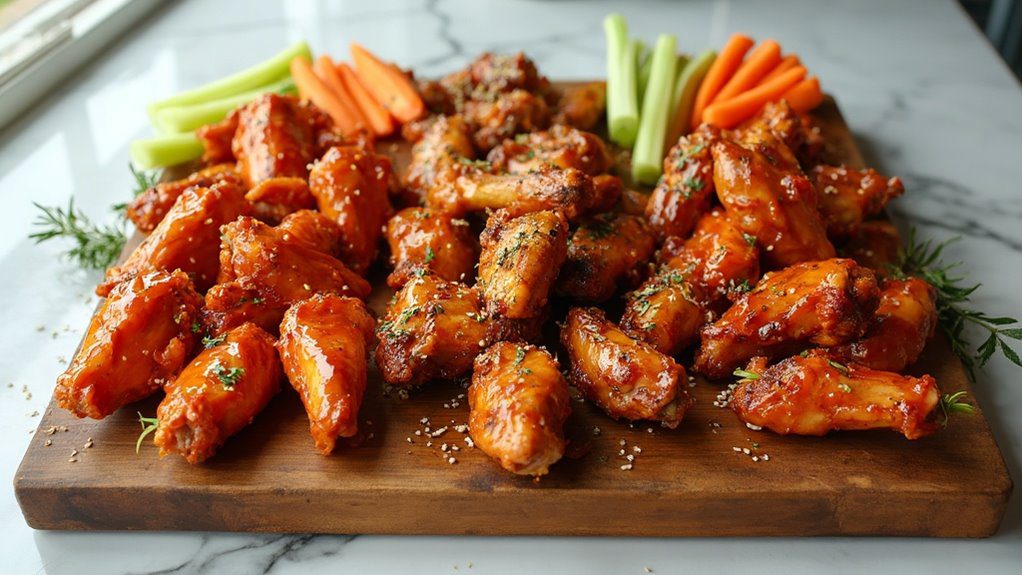
Three simple ingredients are all you need to make these incredibly crispy keto chicken wings in your air fryer. I’ve tested dozens of wing recipes, and this method consistently delivers restaurant-quality results without the carbs or mess of deep frying. You’ll love how the air fryer creates that perfect golden-brown exterior while keeping the meat tender and juicy inside.
Whether you’re hosting game day or just craving a protein-rich snack, these wings won’t disappoint. I’ll show you how to achieve the ultimate crispiness using basic pantry ingredients and simple techniques. The best part? You can customize the flavors to suit your taste while keeping everything keto-friendly. Trust me, once you try making wings this way, you’ll never go back to traditional frying methods.
Recipe
Crispy keto-friendly chicken wings can be made effortlessly in an air fryer, resulting in perfectly cooked wings that are golden brown on the outside and juicy on the inside. This method requires minimal oil while delivering restaurant-quality results, making it an excellent choice for those following a ketogenic diet.
These wings are seasoned with a simple yet flavorful combination of spices that enhance the natural taste of the chicken without adding unnecessary carbs. The air fryer’s rapid air circulation guarantees even cooking and creates the perfect crispy exterior that wing lovers crave.
- 2 pounds chicken wings
- 2 tablespoons olive oil
- 1 teaspoon salt
- 1 teaspoon black pepper
- 1 tablespoon garlic powder
Pat the chicken wings dry thoroughly with paper towels. In a large bowl, toss the wings with olive oil and seasonings until evenly coated. Preheat the air fryer to 380°F. Arrange the wings in a single layer in the air fryer basket, making sure they don’t overlap. Cook for 20-25 minutes, flipping the wings halfway through cooking time. For extra crispiness, increase the temperature to 400°F during the final 2-3 minutes of cooking.
For best results, verify the wings are completely thawed and pat them as dry as possible before seasoning. Work in batches if necessary to avoid overcrowding the air fryer basket, as this will affect the crispiness of the wings. Check the internal temperature of the wings with a meat thermometer – it should reach 165°F. Let the wings rest for 5 minutes before serving to help retain their juices.
Prep Time
While preparing keto air fryer chicken wings doesn’t require extensive kitchen time, you’ll want to set aside about 15 minutes for the initial prep work. The most time-consuming part is patting the wings dry, which is essential for achieving that irresistible crispiness we’re after.
Start by removing the wings from their packaging and thoroughly drying each piece with paper towels. You’ll then spend about 5 minutes mixing your seasonings and tossing the wings until they’re evenly coated. If you’re planning to make all three flavor variations, consider dividing your wings into three portions before seasoning. I’ve found that using separate bowls for each flavor profile helps keep things organized and prevents any mixing of seasonings.
Equipment needed
Making keto air fryer chicken wings requires just a handful of basic kitchen tools that you probably already have at home. You’ll need:
- An air fryer (3.5-quart capacity or larger)
- Paper towels for patting the wings dry
- A large mixing bowl for seasoning
- Measuring spoons for precise seasoning
- Tongs for flipping the wings
- An instant-read meat thermometer
I’ve found that while some recipes call for fancy equipment, these simple tools are all you really need for perfect wings. Your air fryer does most of the heavy lifting, but don’t underestimate the importance of good tongs – they’ll help you flip those wings without breaking the skin. If you’re new to air frying, I’d recommend getting a basic instant-read thermometer to guarantee your wings reach 165°F internally.
Basic Cooking Method and Time
Now that you’ve gathered your equipment, let’s walk through the actual cooking process. First, you’ll want to preheat your air fryer to 380°F while you prep the wings. Pat them completely dry with paper towels – trust me, this step is essential for achieving that restaurant-style crispiness we’re after.
Toss your wings in olive oil and seasonings until they’re evenly coated, then arrange them in a single layer in your air fryer basket. I’ve learned the hard way that overcrowding leads to soggy wings! Set your timer for 20-25 minutes, and don’t forget to flip them halfway through. For that extra crunch we all love, crank up the heat to 400°F during the final 2-3 minutes. You’ll know they’re done when the skin is golden brown and crispy.
Cooking Steps
Let’s plunge into the step-by-step process of making these irresistible keto wings!
First, pat your wings completely dry with paper towels – I’ve learned this step is essential for achieving that coveted crispiness. Next, toss them in a bowl with olive oil and your seasoning mix until they’re evenly coated. Now, preheat your air fryer to 380°F while you arrange the wings in a single layer in the basket. Don’t pile them up, or they won’t crisp properly!
Cook for 10-12 minutes, then flip each wing and cook for another 10-13 minutes until they’re golden brown. For extra crunch (trust me, you’ll want this), crank up the heat to 400°F for the final 2-3 minutes. Keep an eye on them during this last blast of heat!
Step 1. Dry Wings Thoroughly First

The single most important step in achieving perfectly crispy wings starts before any seasoning or cooking begins. You’ll want to pat those wings completely dry with paper towels, and I mean really dry! I’ve learned through countless batches that even a little moisture can create unwanted steam in your air fryer, robbing you of that satisfying crunch we’re after.
Here’s my foolproof method: First, remove wings from packaging and pat them with paper towels. Then, let them rest on a fresh paper towel for 5-10 minutes. Give them one final pat before seasoning. Trust me, this extra attention to drying makes all the difference – I’ve tested this method dozens of times, and it’s never failed to deliver that restaurant-style crispiness we all love.
Step 2. Season Wings With Oil Mixture

With those perfectly dried wings ready to go, seasoning comes next – and I’ve got a foolproof mixture that’ll make your wings sing. In a large bowl, drizzle your olive oil over the wings, then sprinkle on the salt, pepper, and garlic powder. Trust me, I’ve tested dozens of combinations, and this simple blend lets the chicken’s natural flavors shine through.
Now, here’s my secret technique: use your hands to massage the seasonings into every nook and cranny of those wings. Don’t be shy – get in there and make sure each piece is evenly coated. I like to work in batches of 6-8 wings at a time, which helps guarantee nothing gets missed. When you’re done, every wing should have a nice, even sheen from the oil and spices.
Step 3. Place Wings in Basket

Now comes my favorite part – arranging those perfectly seasoned wings in your air fryer basket. I’ve learned through trial and error that proper placement is essential for achieving that irresistible crunch we’re after. Trust me, you’ll want to lay each wing in a single layer, making sure they don’t touch each other.
If you’re like me and cooking for a crowd, you might be tempted to stack those wings. Don’t do it! I’ve made that mistake before, and it resulted in unevenly cooked pieces. Instead, work in batches – it’s worth the extra time. Leave about a quarter-inch of space between each wing to allow the hot air to circulate freely. This guarantees every wing gets that golden-brown exterior we’re looking for. Think of it as giving each wing its own personal space to shine.
Step 4. Flip Wings After 12 Minutes

Once those wings have been cooking for 12 minutes, you’ll notice they’re starting to develop that signature golden color I love so much. Now’s the essential moment to flip each wing carefully using tongs. I learned this timing trick after countless batches – it guarantees even cooking and that perfect crispiness we’re after.
When you’re flipping, take a quick peek at the bottom of each wing. If they’re not quite golden enough, let them cook for an extra minute or two before flipping. I always make sure to rotate the wings from the outer edges toward the center since I’ve found the air fryer’s heat can be a bit more intense around the sides. Trust me, this simple rotation technique makes a noticeable difference in achieving uniformly crispy wings.
Step 5. Check Wings’ Internal Temperature

Safety is my top priority when cooking chicken wings, which is why I always use a meat thermometer to check the internal temperature. I’ve learned through experience that guessing isn’t good enough – you’ll want to insert your thermometer into the thickest part of the wing, avoiding the bone.
Your wings need to reach 165°F (74°C) to be safe to eat. I like to start checking around the 18-minute mark, as cooking times can vary depending on wing size. If they haven’t reached temperature yet, don’t worry! Just pop them back in for 2-3 minute intervals until they’re done. Trust me, it’s worth taking this extra step to guarantee your wings are both safe and delicious. I’ve never served an undercooked wing, and neither should you.
Customization Options
While the basic recipe creates deliciously crispy wings, I love helping people discover different ways to customize their keto wings to match their tastes. You’ll find these three variations are my go-to favorites that never fail to impress:
- Buffalo Style: Toss your wings in melted butter and sugar-free hot sauce for that classic kick
- Garlic Parmesan: Mix grated parmesan, melted butter, minced garlic, and Italian herbs
- Asian-Inspired: Combine coconut aminos, sesame oil, ginger, and a sugar-free sweetener
I’ve served these at countless gatherings, and guests can’t tell they’re keto-friendly. Pro tip: Keep your sauces warm while the wings cook, then toss them immediately after they’re done for the best coating. Remember to calculate any additional carbs from your chosen sauce ingredients.
Ingredients list (with precise measurements)

Now that you’ve chosen your flavor direction, let’s get everything measured and ready for your perfect keto wings. You’ll need:
For the Base Recipe:
- 2 pounds chicken wings, separated into flats and drums
- 2 tablespoons olive oil
- 1 teaspoon salt
- 1 teaspoon black pepper
- 1 tablespoon garlic powder
I’ve found that measuring everything before you start makes the process so much smoother. Trust me, I’ve learned this the hard way! Place all your ingredients in small bowls, just like those TV chefs do – it’s not just for show. You’ll want to have your measuring spoons handy and a large mixing bowl for tossing the wings in their seasonings. I always keep extra paper towels nearby for patting the wings dry.
Storage Information
To keep your delicious keto wings tasting fresh and crispy, I’ve learned the best way is storing them in an airtight container in the fridge for up to 3 days. When I first started making these wings, I discovered that proper storage makes all the difference in maintaining their texture and flavor.
For reheating, you’ll want to avoid the microwave – trust me, I learned this the hard way! Instead, pop them back in your air fryer at 350°F for 3-4 minutes. They’ll come out almost as crispy as when you first made them. If you’re meal prepping, I suggest keeping any sauces separate until serving time. This prevents the wings from getting soggy, and you’ll be amazed at how well they hold up when stored properly.
Health Benefits or Special Features
These keto air fryer chicken wings aren’t just tasty – they’re packed with impressive nutritional benefits that’ll make you feel good about serving them. You’ll get plenty of protein to support muscle growth, and since they’re cooked in the air fryer, you’ll consume considerably less fat than traditional deep-fried versions.
The wings are naturally gluten-free and perfect for anyone following a low-carb or keto diet. Each serving provides essential B vitamins, zinc, and iron, supporting your immune system and energy levels. Plus, using the air fryer method means you’ll cut calories without sacrificing that satisfying crunch everyone loves. I’ve found that making these wings helps me stay on track with my keto goals while still enjoying one of my favorite foods.
Prep Time
Getting your keto chicken wings ready for the air fryer takes just 10 minutes of hands-on prep time. You’ll love how quick and straightforward the preparation process is, especially when you’re juggling other tasks in the kitchen. I’ve found that organizing my ingredients beforehand makes the process even smoother.
Here’s what you’ll need to do: pat the wings dry thoroughly (about 3-4 minutes), mix your seasonings (1 minute), and toss everything together (2-3 minutes). I always set out my ingredients while the wings are thawing – it’s a real time-saver! The remaining prep time involves arranging the wings in your air fryer basket, making sure they’re not touching. If you’re cooking multiple batches, you can season all your wings at once to streamline the process.
Cook Time
The total cook time for perfectly crispy keto chicken wings is 20-25 minutes in your air fryer. You’ll want to cook them at 380°F, flipping the wings halfway through to guarantee even browning. I’ve found that this temperature hits the sweet spot for achieving that restaurant-style crispiness we all love.
For that extra crunch we all crave, crank up the heat to 400°F during the final 2-3 minutes of cooking. Keep an eye on them during this last blast of heat – trust me, it makes all the difference! If you’re cooking multiple batches, maintain the same timing for each round. Remember to let each batch rest for about 3 minutes after cooking, which lets the juices redistribute while the skin stays perfectly crispy.
Total Time
When you factor in all the prep work and cooking stages, you’ll need about 35-40 minutes from start to finish for these keto wings. The initial prep, including patting the wings dry and seasoning them, usually takes around 10 minutes. While your air fryer preheats for 3-5 minutes, you can arrange the wings for their cooking batches.
The actual cooking process takes 20-25 minutes, but don’t forget you’ll need a minute or two in between batches to flip the wings and adjust the temperature. If you’re making multiple batches, you might want to keep the first batch warm in your oven set to 170°F. The good news is, even with multiple batches, you can have delicious, crispy wings ready in under an hour.
Yield
Following your 35-40 minute cooking adventure, you’ll end up with enough keto air fryer wings to serve 4-6 people generously. Each guest can enjoy about 5-6 wings per serving, which is perfect for satisfying those savory cravings while keeping carbs in check.
I’ve found that 2 pounds of wings typically yields around 20-24 pieces, depending on their size. If you’re hosting a bigger crowd, you can easily double the recipe – just remember to cook them in batches to maintain that perfect crispiness. For a casual game day gathering, I’d suggest planning on 6-8 wings per person, especially if these are your main protein. Don’t forget that leftovers reheat beautifully in the air fryer, so making extra isn’t a bad idea!
Final Thoughts
Making keto-friendly air fryer wings couldn’t be easier, and I’m thrilled to share this foolproof recipe that’s become a staple in my weekly meal rotation. After countless batches perfecting this method, I can confidently say you’ll never want to order takeout wings again.
Whether you’re hosting a game day party or just craving a protein-rich snack, these wings deliver restaurant-quality results without the carbs or guilt. I’ve found that the key to success lies in thoroughly drying the wings and avoiding overcrowding the basket. Trust me, the extra few minutes of prep work makes all the difference in achieving that coveted crispy skin. Give this recipe a try, and you’ll see why my family requests these wings every weekend.
Frequently Asked Questions
Can I Stack Wings in Multiple Layers if I Have Too Many?
You shouldn’t stack wings in layers, as this prevents proper air circulation. Instead, cook them in multiple batches to guarantee each wing gets crispy and evenly cooked.
What’s the Best Way to Separate Whole Chicken Wings Into Sections?
To disassemble your wing companions, locate the joints, then firmly press down with a sharp knife where the segments meet. You’ll separate them into drumettes and flats with ease.
Should I Marinate the Wings Before Air Frying Them?
You don’t need to marinate these wings. Simply pat them dry and toss with olive oil and seasonings right before cooking. This method guarantees crispy skin and flavorful meat.
Can I Cook Frozen Wings Directly in the Air Fryer?
Want perfectly crispy wings? While you can cook frozen wings directly in your air fryer, you’ll need to add 5-7 minutes to the cooking time and they won’t get quite as crispy.
How Do I Prevent the Wings From Sticking to the Air Fryer Basket?
Spray your air fryer basket with non-stick cooking spray or brush it with oil before adding wings. You’ll also want to flip them halfway through cooking to prevent sticking.
Conclusion
You’ve mastered three incredible ways to serve up crispy, juicy keto wings straight from your air fryer. Whether you’re craving the classic buffalo heat, savory garlic parmesan, or sweet-and-smoky barbecue, these wings deliver restaurant-quality results without the carbs. As the aroma fills your kitchen and that first satisfying crunch gives way to tender meat, you’ll know you’ve found your new go-to recipe for game days and family gatherings.