Introduction
Whether you follow a carnivore diet or simply want a protein-packed meal option, this easy-to-prepare snack box is perfect for your busy lifestyle. I’ve found that combining hard-boiled eggs with quality beef jerky creates an ideal grab-and-go solution that’ll keep you satisfied for hours.
As someone who’s always on the move, I understand the challenge of finding convenient, nutrient-dense meals that align with a meat-based diet. That’s why I love this protein box – it’s simple to assemble, requires minimal prep time, and delivers all the essential nutrients you need. You’ll get plenty of protein, healthy fats, and zero carbs, making it an excellent choice for maintaining your energy levels throughout the day.
Recipe
A protein-rich combination of hard-boiled eggs and beef jerky creates a satisfying and portable meal solution perfect for busy days. This simple preparation requires minimal cooking skills while delivering maximum nutritional benefits through quality proteins and healthy fats.
This carnivore snack box serves as an ideal option for meal prep, offering convenience without sacrificing nutritional value. The components can be prepared in advance and assembled quickly when needed, making it an excellent choice for work lunches, post-workout recovery, or travel sustenance.
- 6 large eggs
- 8 ounces beef jerky
- 1/2 teaspoon sea salt
- 1/4 teaspoon black pepper
- 2 tablespoons fresh parsley, chopped
Place eggs in a medium pot and cover with cold water by one inch. Bring to a rolling boil over high heat, then remove from heat, cover the pot, and let stand for 10 minutes. Transfer eggs to an ice bath for 5 minutes. Peel eggs and slice in half lengthwise. Season egg halves with salt and pepper. Arrange the seasoned eggs in a container alongside pieces of beef jerky, then garnish with fresh parsley.
For best results, immediately refrigerate any unused portions in an airtight container. Choose eggs that are at least one week old for easier peeling. When preparing for travel, pack in an insulated container with ice packs and consume within 4 hours if unrefrigerated. The eggs can be stored for up to 5 days when properly refrigerated, though the jerky’s storage time may vary based on the specific product used.
Prep Time
Preparing this carnivore snack box won’t take much time out of your busy schedule. You’ll need about 15 minutes of active prep time, plus another 15 minutes for cooling and peeling the eggs. I’ve found that organizing my ingredients beforehand makes the process even smoother.
Here’s a quick breakdown of the time involved:
- Bringing water to boil: 5-7 minutes
- Egg cooking time: 10 minutes
- Ice bath cooling: 5 minutes
- Peeling and slicing eggs: 5 minutes
- Portioning jerky and assembly: 3 minutes
Trust me, once you’ve made this a few times, you’ll get even faster. I can now prep a week’s worth of these protein-packed boxes in under 30 minutes total, which is perfect for my Sunday meal prep routine.
Equipment needed
You’ll need just a few basic pieces of kitchen equipment to create these protein-packed snack boxes. Gather these essential items from your kitchen:
- A medium-sized pot for boiling eggs
- A slotted spoon for egg removal
- A sharp knife for cutting eggs
- A large bowl for the ice bath
- Airtight containers for storage
- An ice pack for transport
- A cutting board
- Paper towels
I’ve found that investing in quality storage containers makes a huge difference in keeping your eggs fresh throughout the week. While you can use basic plastic containers, I prefer glass ones with snap-locking lids – they’re more durable and won’t retain odors. For easy transport, grab an insulated lunch bag that’ll fit both your container and ice pack comfortably.
Basic Cooking Method and Time
The basic method for this protein-packed meal requires just 20 minutes of active cooking time. You’ll start by placing your eggs in a pot with cold water, bringing it to a boil, then letting them rest covered for exactly 10 minutes. Trust me, timing is everything for perfect hard-boiled eggs!
While your eggs are cooking, you can portion out your jerky pieces. Once the eggs are done, give them an ice bath – I’ve found this makes peeling them so much easier. After 5 minutes in the ice water, peel and slice the eggs in half. Season them with salt and pepper, arrange them alongside your jerky in your meal prep container, and add a sprinkle of fresh parsley for a pop of color.
Cooking Steps
You’ll want to start by giving your eggs a thorough rinse under cool water before carefully lowering them into a pot. After your eggs have cooked for exactly ten minutes, transfer them immediately to your prepared ice bath to stop the cooking process and prevent that grayish ring from forming around the yolk. Once cooled and peeled, arrange your halved eggs in serving bowls and season them with salt and pepper, adding any garnishes you’d like.
Step 1. Rinse Eggs Thoroughly First

Before starting your hard-boiled egg prep, rinse each egg thoroughly under cool running water. I always run my fingers gently over the shells to remove any dirt or debris that might be lingering on the surface. You’ll want to be extra thorough since eggshells are porous and can harbor bacteria.
I learned this step the hard way when I once skipped rinsing and ended up with some questionable-looking eggs. Trust me, it’s worth the extra minute! Make certain you’re checking for any cracks or imperfections while you rinse – if you spot a cracked egg, set it aside for scrambling instead. Once your eggs are squeaky clean, they’re ready for boiling. This simple step guarantees you’ll get the cleanest, safest results for your carnivore snack box.
Step 2. Prepare Ice Water Bath

While your eggs are coming to a boil, prepare a simple ice bath by filling a large bowl halfway with cold water and adding 2-3 cups of ice cubes. You’ll want your ice bath ready to go the moment those eggs finish cooking – trust me, I learned this the hard way! The rapid cooling prevents that grayish ring from forming around the yolk and helps make peeling easier.
Make sure your bowl is large enough to hold all the eggs without overcrowding. I like to use my biggest mixing bowl, which gives the eggs plenty of room to chill evenly. Once the eggs go in, they’ll need about 5 minutes in the ice bath. Don’t skip this step – it’s essential for achieving that perfect, creamy yellow center.
Step 3. Start Ten-Minute Egg Timer

Timing plays an essential role in achieving perfectly cooked hard-boiled eggs. Once you’ve brought your pot of water to a rolling boil, immediately remove it from the heat and set your timer for exactly 10 minutes. Trust me, I’ve learned through plenty of trial and error that this sweet spot gives you that perfect, creamy yolk every time.
While you’re waiting, resist the urge to peek under the lid – keeping the heat trapped inside is vital. I like to use this time to prep my jerky portions and gather my seasonings. If you’re worried about timing, just remember this simple rule: the moment you remove the pot from heat is when you start your countdown. After your timer beeps, you’ll be ready for the ice bath step.
Step 4. Transfer Eggs to Bowls

Your next essential step is transferring those perfectly-timed eggs into ice-cold water. I’ve learned through countless meal preps that this ice bath step isn’t optional – it’s imperative for achieving that perfect peel-ability you want. Fill a medium bowl with cold water and ice cubes, then carefully remove each egg from the hot water using a slotted spoon.
Let those eggs chill out in their ice bath for exactly 5 minutes. You’ll know they’re ready when they’re cool enough to handle comfortably. Trust me, I’ve burned my fingers enough times to know that patience here pays off! This rapid cooling not only makes peeling easier but also prevents that grayish ring from forming around the yolk. Plus, it stops the cooking process right where you want it, ensuring your eggs stay perfectly firm but creamy.
Step 5. Season and Plate Eggs
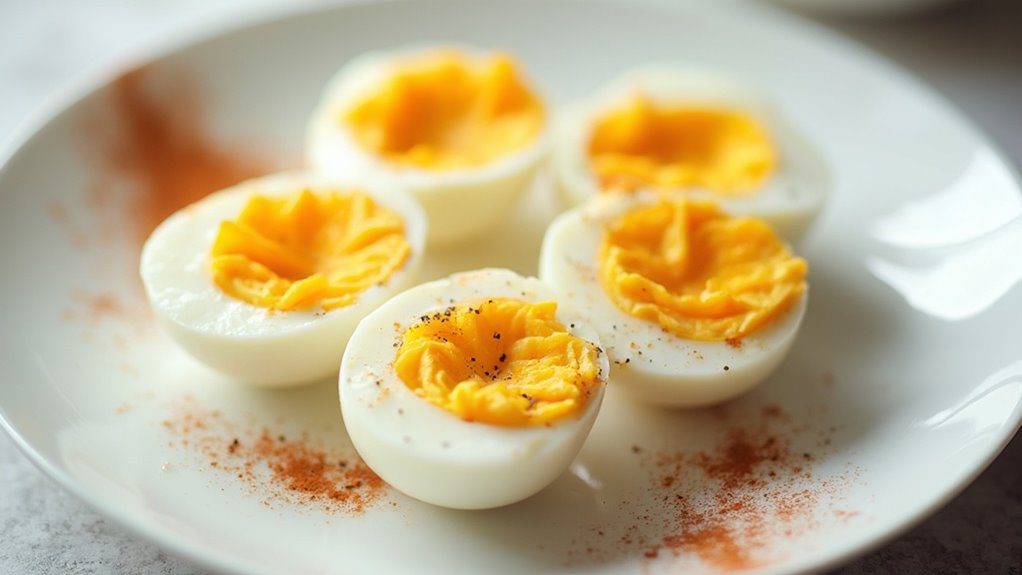
Fresh eggs ready for seasoning make this next step truly delightful. I love how the perfectly cooked whites provide an ideal canvas for your favorite seasonings. Start by carefully slicing each egg in half lengthwise, then arrange them on your serving plate with the yolks facing up.
Now’s the time to get creative with your seasonings. I usually start with a light sprinkle of sea salt and freshly ground black pepper – trust me, it makes all the difference. For extra flair, add a pinch of smoked paprika or red pepper flakes if you’re feeling spicy. Finally, position your jerky pieces alongside the eggs, creating an appetizing arrangement. I like to garnish with fresh parsley for a pop of color and subtle flavor that’ll make your protein box look truly Instagram-worthy.
Customization Options
Several delicious variations can transform this basic carnivore box into an exciting rotation of protein-packed meals. You’ll love swapping traditional beef jerky with other options like turkey, bison, or salmon jerky for different flavor profiles. I’ve found that adding duck eggs instead of chicken eggs creates a richer, more satisfying experience.
For seasoning variety, try these pairings:
- Everything bagel seasoning on eggs with peppered jerky
- Smoked paprika and garlic powder with teriyaki jerky
- Red pepper flakes and dried herbs with spicy jerky
You can also experiment with different cooking times for your eggs. I prefer my yolks slightly jammy at 8 minutes, but you might enjoy them fully set at 10 minutes or extra-firm at 12 minutes.
Ingredients list (with precise measurements)
Now that we’ve explored exciting variations, let’s get specific about what you’ll need to assemble these protein-packed boxes. I’ve found through trial and error that these portions work perfectly for a satisfying meal:
- 6 large eggs (farm-fresh if possible)
- 8 ounces of high-quality beef jerky
- 1/2 teaspoon sea salt
- 1/4 teaspoon freshly ground black pepper
- 2 tablespoons fresh parsley, chopped
For storage and assembly, you’ll also need:
- 1 medium-sized airtight container
- Parchment paper for separating layers
- Small container for salt and pepper (if traveling)
- Ice pack for transport
Trust me, these measurements create the perfect balance of protein and flavor while keeping portions reasonable for a single serving.
Storage Information
Proper storage makes all the difference in keeping your carnivore snack box fresh and delicious throughout the week. You’ll want to store your hard-boiled eggs in an airtight container in the fridge, where they’ll stay fresh for up to 5 days. As for the jerky, keep it in its original packaging or transfer it to a sealed container – it’ll maintain quality for about a week once opened.
When you’re taking your snack box on the go, remember these key points:
- Use an insulated container with ice packs
- Consume within 4 hours if unrefrigerated
- Keep eggs and jerky separated to prevent moisture transfer
- Store at 40°F or below when possible
- Avoid leaving in direct sunlight or hot cars
For best results, prep your boxes on Sunday night for the week ahead.
Health Benefits or Special Features
Beyond keeping your snack box properly stored, you’ll benefit from knowing exactly what this protein-packed combo can do for your health. You’re getting complete protein from both the eggs and jerky, which means all essential amino acids for muscle maintenance and recovery. The eggs deliver vitamin D, B12, and choline for brain health, while the yolks provide healthy fats that’ll keep you satisfied longer.
I love how this combo fits perfectly into a low-carb or carnivore lifestyle. You’ll get around 35 grams of protein per serving, making it ideal for post-workout recovery or a filling lunch. Plus, there’s no need for refrigeration for up to 4 hours, so you can take it hiking, traveling, or to the office without worry.
Prep Time
Getting this protein-packed snack box ready takes just 15 minutes of active prep time. While the eggs need about 15 minutes total to cook and cool, you’ll only spend a few minutes actively working on them. I’ve found that using my phone’s timer helps me nail the perfect hard-boiled egg every time.
You’ll need:
- 10 minutes to boil and rest the eggs
- 5 minutes for the ice bath
- 5 minutes to peel and slice the eggs
- 2-3 minutes to portion out your jerky
- 1 minute to garnish and pack
The best part? You can prep multiple boxes at once without adding much time to the process. I usually make a week’s worth in one go, which saves me valuable time during busy weekdays.
Cook Time
The actual cook time for this carnivore box is surprisingly short, with the eggs being your only cooked component. You’ll spend about 15 minutes total on the cooking process – 10 minutes for the eggs to sit in hot water and 5 minutes for cooling them in the ice bath. I’ve found that setting a timer is essential, as even a minute too long can lead to that dreaded green ring around the yolk.
While your eggs are doing their thing, you can prep your container and portion out the jerky. Trust me, once you’ve mastered this timing, you’ll be amazed at how quickly you can put together a protein-packed meal. The best part? There’s no need to cook the jerky since it’s ready to eat, making this entire process efficient and straightforward.
Total Time
From start to finish, you’ll need about 25 minutes to complete this carnivore snack box. The actual hands-on prep work only takes about 5 minutes, while the rest is mostly waiting time. I’ve found that you can easily multitask during the 10-minute egg cooking period – I usually tidy up my kitchen or pack other items for my day.
The ice bath cooling takes another 5 minutes, and peeling and arranging the eggs alongside your jerky will take the final 5 minutes. If you’re meal prepping for the week, you can multiply these portions and still maintain roughly the same timeline. Just make sure you’ve got a pot large enough to accommodate all your eggs without overcrowding them.
Yield
One complete carnivore snack box yields two hearty servings, perfect for sharing or saving half for later. You’ll get three whole hard-boiled eggs and 4 ounces of jerky per serving, which provides approximately 35-40 grams of protein – enough to keep you satisfied for hours.
I’ve found this portion size hits the sweet spot for most people’s needs, whether you’re having it for lunch or as a post-workout refuel. If you’re meal prepping for the week, you can easily double or triple the recipe without any extra effort. Just remember to store each serving separately in airtight containers to maintain freshness. For smaller appetites, you might stretch this into three lighter servings by using two eggs and about 2.5 ounces of jerky per portion.
Final Thoughts
While many meal prep options can feel complicated or time-consuming, I’ve grown to love this carnivore snack box for its beautiful simplicity and effectiveness. When I first switched to a carnivore diet, finding portable meals was a challenge, but this combination has become my go-to solution. You’ll appreciate how these two protein powerhouses work together to keep you satisfied and focused.
I’ve taken these boxes on flights, road trips, and busy workdays, and they’ve never let me down. The best part? You won’t need to worry about complicated recipes or extensive prep time. Just remember to keep your eggs properly chilled and choose quality jerky. Trust me, once you try this protein-packed duo, you’ll wonder why you didn’t think of it sooner.
Frequently Asked Questions
Can I Use Turkey Jerky Instead of Beef Jerky?
You can definitely use turkey jerky instead of beef jerky. It’s a leaner protein option that’ll work just as well, providing similar nutritional benefits while offering a different flavor profile.
What’s the Best Way to Transport This Meal on an Airplane?
Pack your hard-boiled eggs and jerky in a TSA-compliant airtight container. Keep them cold with a frozen gel pack in an insulated lunch bag. You’ll need to consume within 4 hours.
Will the Eggs Smell if I Eat This at My Office Desk?
Like a calling card in a quiet room, hard-boiled eggs can leave a lingering scent. You’ll want to eat them in the break room or outside to keep your workspace pleasant for coworkers.
Can I Add Mayonnaise or Mustard Packets to This Box?
You can definitely add mayo or mustard packets to enhance the flavor. They’ll stay fresh at room temperature until opened, and they’re perfect for dipping your eggs.
How Do I Prevent the Jerky From Making the Eggs Too Salty?
Want to keep your eggs from becoming a salt mine? Store jerky and eggs in separate compartments of your container, and don’t let them touch until you’re ready to eat.
Conclusion
You’ll find this protein-packed combo hits the spot like a bullseye when you’re racing through your day. With perfectly cooked eggs and savory jerky at your fingertips, you’re always prepared to fuel your carnivore lifestyle, no matter where life takes you. Keep these handy boxes ready in your fridge, and you’ll never have to worry about straying from your dietary path or going hungry again.


